
Correct CPR Technique Explained | Chest Compressions Step-by-Step | 3D Animation
Comprehensive Guide to the Correct CPR Technique: Saving Lives with Science Cardiopulmonary Resuscitation (CPR) is an emergency life-saving procedure performed wh...
Medically Reviewed By
Medscope Editorial Team Verified
Comprehensive Guide to the Correct CPR Technique: Saving Lives with Science
Cardiopulmonary Resuscitation (CPR) is an emergency life-saving procedure performed when the heart stops beating, a condition known as sudden cardiac arrest (SCA). Sudden cardiac arrest is one of the leading causes of death globally, striking without warning. When the heart stops, the brain and other vital organs are immediately deprived of oxygen. Without intervention, irreversible brain damage begins within 4 to 6 minutes, and clinical death follows shortly after. However, immediate and highly effective CPR can double or even triple a victim’s chance of survival. The primary goal of CPR is to act as an artificial, mechanical pump, maintaining a critical level of blood flow to the brain and heart until advanced medical support arrives or an Automated External Defibrillator (AED) can be used to restore a normal heart rhythm. Mastering the correct CPR technique is absolutely essential for healthcare professionals, nursing students, emergency responders, and everyday bystanders.
The Deep Physiology of Cardiac Arrest and CPR
To truly understand the importance of flawless CPR, one must understand the underlying physiology. In a normal, healthy state, the heart's ventricles forcefully contract (systole) to push oxygen-rich blood into the aorta and the pulmonary artery. During a sudden cardiac arrest, this synchronized mechanical pumping action completely ceases. The heart may be in ventricular fibrillation (a chaotic, quivering rhythm where no blood is pumped) or asystole (a complete "flatline" with no electrical or mechanical activity).
When you perform high-quality chest compressions, you are doing more than just pushing on the chest. You are manually compressing the heart between the sternum (breastbone) and the thoracic spine. This mechanical squeeze forces blood out of the left and right ventricles into the systemic and pulmonary circulation. This is known as the "cardiac pump theory." Additionally, the "thoracic pump theory" suggests that pushing on the chest increases overall intrathoracic pressure, which forces blood out of the chest cavity. When you release the compression, the chest recoil creates a negative pressure (a vacuum effect) within the thoracic cavity, drawing venous blood back into the right side of the heart and air into the lungs. Your goal is to generate an adequate coronary perfusion pressure (CPP)—the pressure gradient responsible for driving blood into the coronary arteries to feed the heart muscle itself. If CPP falls below a critical threshold (typically 15 mmHg), resuscitation is almost universally unsuccessful.
The AHA C-A-B Sequence in Basic Life Support (BLS)
Historically, CPR was taught using the A-B-C method (Airway, Breathing, Compressions). However, extensive clinical research led the American Heart Association (AHA) to revolutionize the guidelines, shifting the sequence to C-A-B (Compressions, Airway, Breathing). This monumental change was made because the vast majority of cardiac arrests in adults are caused by ventricular fibrillation, where oxygen is already present in the bloodstream, but it simply isn't circulating. Delaying compressions to establish an airway reduces survival. By starting with compressions, you immediately circulate the oxygen that is already present in the blood.
Step 1: Rapid Assessment of Safety and Responsiveness
Before initiating CPR, you must ensure the environment is completely safe for both you and the victim. Never become a second victim. Approach the person, tap them firmly on the collarbone or shoulder, and shout loudly, "Are you okay? Can you hear me?" If the victim is unresponsive, you must assess for normal breathing. It is critical to recognize that agonal gasps—snorting, gurgling, or sporadic heavy breaths—are not normal breathing; they are a sign of cardiac arrest. Simultaneously, healthcare providers should check the carotid pulse for no less than 5 seconds and no more than 10 seconds. If there is no pulse or normal breathing, you must act instantly.
Step 2: Activate the Emergency Response System
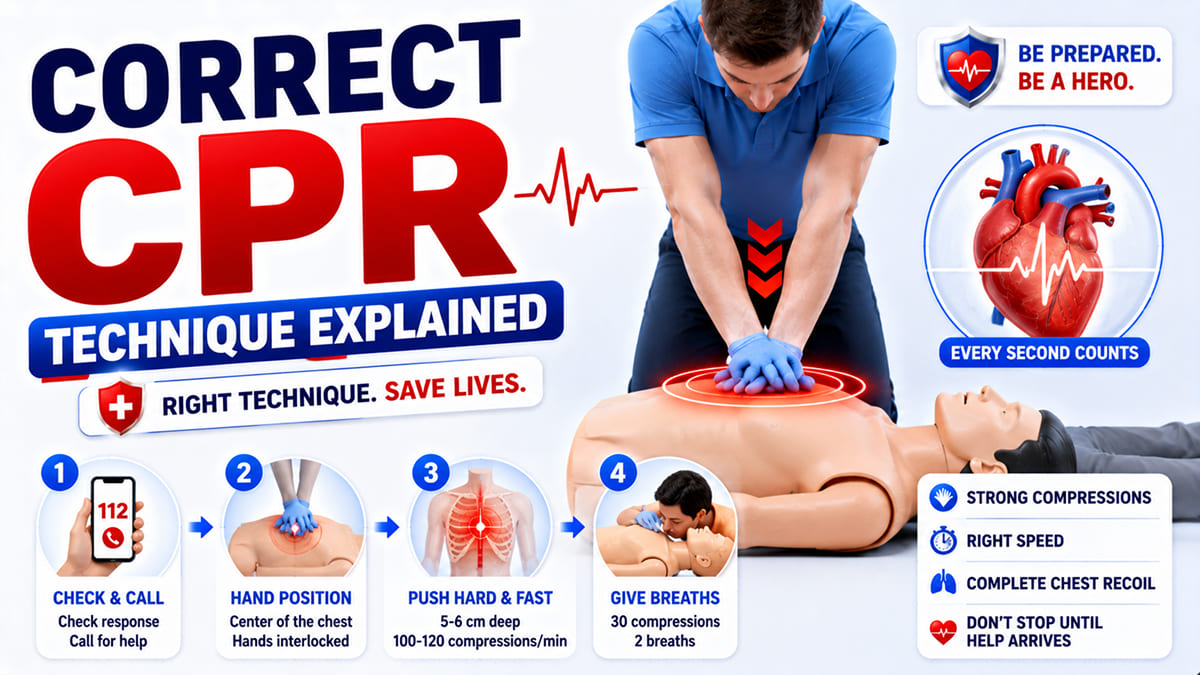
Time is muscle, and time is brain. If you are alone, use your mobile phone to call emergency medical services (e.g., 911, 112) and put the phone on speaker mode. If an AED is immediately nearby, grab it. If other bystanders are present, be direct and authoritative. Do not yell into a crowd; point directly to a specific person and command, "You in the blue shirt, call 911 and get an AED!"
Step 3: High-Quality Chest Compressions (The "C" in C-A-B)
High-quality chest compressions are the undisputed foundation of effective CPR. Even a slight deviation from the optimal technique can drastically reduce the patient's chances of survival. Follow these precise mechanics for adult CPR:
- Perfect Hand Placement: Expose the patient's chest. Place the heel of your dominant hand directly on the center of the victim's chest, specifically on the lower half of the sternum (breastbone). Place your second hand on top of the first and securely interlace your fingers. Ensure your fingers are pulled up and off the ribs to prevent rib fractures and concentrate the force on the sternum.
- Optimal Body Positioning: Kneel as close to the victim's side as possible. Position your shoulders directly vertically over your hands. Keep your elbows strictly straight and locked. You should use the weight of your upper body and core to push down, rather than relying solely on your triceps and shoulder muscles, which will fatigue rapidly.
- Depth of Compressions: Push hard. You must compress the adult chest to a depth of at least 2 inches (5 cm), but you must avoid exceeding 2.4 inches (6 cm). Shallow compressions fail to squeeze the heart enough to generate forward blood flow.
- Rate of Compressions: Push fast. Maintain a strict, consistent rate of 100 to 120 compressions per minute. Compressing too slowly fails to build up adequate blood pressure. Compressing too fast (e.g., 140/min) does not give the heart enough time to refill with blood between beats. You can mentally follow the beat of the famous song "Stayin' Alive" by the Bee Gees or "Imperial March" from Star Wars.
- Complete Chest Recoil: This is a frequently missed but incredibly vital step. After every single compression, you must allow the chest to return to its normal, fully expanded position. Leaning heavily on the chest prevents the negative thoracic pressure needed to draw venous blood back into the heart chambers, rendering your next compression highly ineffective.
Step 4: Open the Airway (The "A" in C-A-B)
After completing exactly 30 high-quality chest compressions, you must quickly open the victim's airway. When an individual is unconscious, the muscles of the tongue and throat relax, falling backward and occluding the airway. For a patient without a suspected cervical spine or neck injury, use the head tilt-chin lift maneuver. Place one hand flat on the victim's forehead and apply firm backward pressure to tilt the head back. Simultaneously, place the fingers of your other hand under the bony part of the lower jaw near the chin and lift the jaw upward. If a cervical spine trauma is strongly suspected (e.g., a car accident or a fall), healthcare providers must use the jaw-thrust maneuver without tilting the neck.
Step 5: Deliver Rescue Breathing (The "B" in C-A-B)
Maintain the open airway and pinch the victim's nose tightly closed to prevent air escape. Take a normal (not deep) breath, create a tight seal completely covering the victim's mouth with your own (or use a pocket mask/barrier device), and blow steadily for exactly 1 second. Watch closely for the chest to rise. If the chest does not rise, the airway is likely blocked; reposition the head and try again. Deliver the second breath. The entire process of delivering these 2 rescue breaths must take less than 10 seconds. Prolonged pauses in compressions are deadly. Immediately resume chest compressions. The universal ratio is 30 compressions to 2 breaths (30:2) for single-rescuer adult CPR.
Integrating the Automated External Defibrillator (AED)
An AED is a portable electronic device that automatically diagnoses life-threatening cardiac arrhythmias (specifically ventricular fibrillation and pulseless ventricular tachycardia) and treats them through defibrillation. Defibrillation is the application of electrical therapy which stops the chaotic rhythm, allowing the heart's natural pacemaker (the SA node) to re-establish an effective rhythm. As soon as an AED arrives at the scene, turn it on immediately and follow the voice prompts. The device will instruct you to expose the chest, dry it if it is wet, and apply the adhesive electrode pads—one on the upper right chest and one on the lower left side under the armpit. You must stop CPR only when the AED specifically tells you it is analyzing the heart rhythm or advising a shock. If a shock is advised, loudly state "Clear!", ensure nobody is touching the patient, and press the shock button. The millisecond the shock is delivered, immediately resume chest compressions starting with compressions, not breaths.
Special Populations: Pediatric and Infant CPR Modifications
While the core principles remain the same, CPR must be modified for children and infants due to physiological differences. In adults, cardiac arrest is almost always a primary cardiac event. In children and infants, cardiac arrest is most commonly secondary to severe respiratory failure or hypoxia (lack of oxygen). Therefore, airway management and rescue breathing are relatively more critical in pediatric populations.
- Infants (Under 1 year): Check the brachial pulse on the inside of the upper arm, not the carotid. For compressions, use two fingers placed just below the nipple line, or the two-thumb encircling hands technique if two rescuers are present. Compress to a depth of about 1.5 inches (4 cm). If two healthcare providers are present, the ratio changes to 15 compressions to 2 breaths.
- Children (1 year to puberty): You may use one or two hands for compressions, depending on the child's size, compressing to a depth of about 2 inches (5 cm). Similar to infants, a two-rescuer healthcare provider scenario utilizes a 15:2 ratio to emphasize oxygenation.
Deadly CPR Mistakes You Must Avoid
Even highly trained medical professionals can experience skill decay or perform poorly under extreme stress. Avoiding these common pitfalls is essential:
- Leaning on the Chest: Not allowing full chest recoil is the number one cause of failed CPR. The heart cannot pump blood if it has no blood inside it.
- Frequent and Prolonged Interruptions: Your goal is to maximize the "chest compression fraction" (the total time spent actually compressing the chest). Every second you stop, blood pressure drops to zero. Never pause for more than 10 seconds to check pulses, deliver breaths, or analyze the AED.
- Hyperventilation: Delivering breaths that are too large, too forceful, or too frequent is a critical error. Hyperventilation severely increases intrathoracic pressure. This high pressure acts like a roadblock, preventing venous blood from returning to the heart, which drastically reduces the cardiac output generated by your compressions. It also increases the risk of forcing air into the stomach (gastric inflation), which can cause vomiting and fatal aspiration into the lungs.
- Poor Posture and Fatigue: Using your arms instead of your core will lead to rapid exhaustion. If a second rescuer is present, you must switch compressor roles every 2 minutes (about 5 cycles of 30:2) to prevent fatigue, as compression quality drops significantly after just two minutes, even if the rescuer does not feel tired.
Conclusion: The Chain of Survival
CPR is just one link in the American Heart Association's "Chain of Survival." The chain includes early recognition and activation of emergency services, immediate high-quality CPR, rapid defibrillation, effective advanced life support, and comprehensive post-cardiac arrest care. However, it all begins with the bystander or the first responder. By dedicating yourself to mastering the correct CPR technique—focusing on adequate depth, proper rate, complete recoil, and minimal interruptions—you transition from a helpless observer to a capable lifesaver. Your hands literally become the bridge between sudden cardiac death and a second chance at life.